How to Make Slideshow from Images?
- Introduction
- Step 1. Input Images
- Step 2. Apply Audio
- Step 3. Preset Output Quality
- Step 4. Output the Slideshow
Introduction
Using Freemore Slideshow Maker to create a slideshow of your images or graphics is an elegant way to share your work with the public. To make your slideshows creative and special, you are allowed to add different transition effects between each image.
Step 1. Input Images
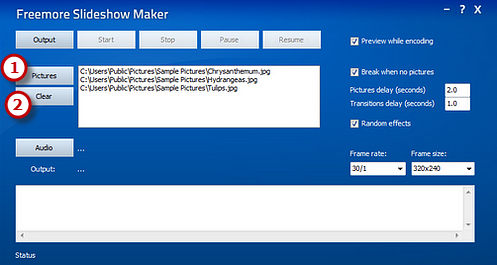
Launch Freemore Slideshow Maker. Click "Pictures" (1) to select images. The selected ones will be displayed in the task list in alphabetical order. If needed, click "Clear" (2) to remove all of them from the list.

Step 2. Apply Audio
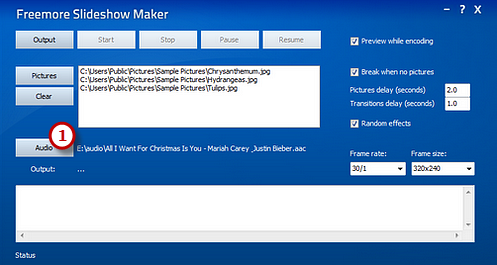
Freemore Slideshow Maker allows you to add music to your slideshow through "Audio" (1). All of the audio formats you can find are supported.

Step 3. Preset Output Quality
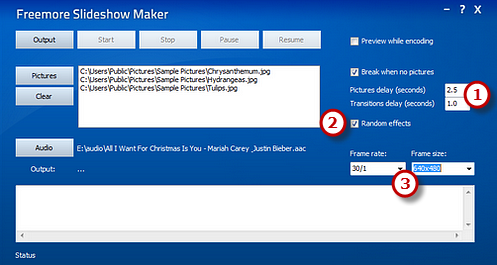
You are allowed to set how long the pictures and transitions delay by entering the numbers in "Pictures delay (seconds)" and "Transitions delay (seconds)" boxes (1). Check "Random effects" (2) to add different random transition effects between each image. Frame rate are optional (30/1; 25/1; 15/1) as well as Frame size (320 * 240; 640 * 480; 1280 * 960) (3). Check "Preview while encoding"/"Break when no pictures" according to your need.

Step 4. Output the Slideshow
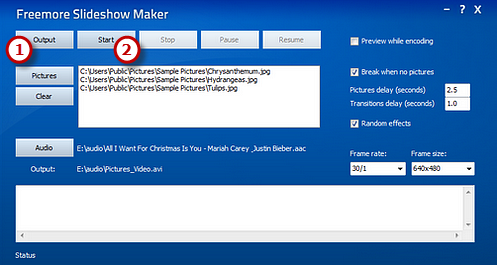
Click "Output" (1) on the left top of the window to choose an output folder and click "Start" (2) to start conversion. At the bottom, you can see the pictures being encoded with detailed information like Frame number, FPS, Size, etc. Within seconds, the conversion will be finished and you can easily find your slideshow in the specified output folder.

